Posterior Heel Pain – pain at the back of the heel
Do you have pain at the back of the heel?
This is called Posterior Heel Pain and there are actually lots of different causes for pain in this area. There are some common signs and symptoms for each of them. Here we will go through each of them, from most common to least common, so you can work out which problem you might have!
Achilles Insertional Tendinopathy
An achilles insertional tendinopathy is the most common cause of pain at the back of the heel. This is an irritation of where the achilles tendon attaches onto the back of your heel (calcaneous). It is quite different to your usual achilles tendon pain which is typically felt higher up on the tendon, about 2-3cm above the calcaneous. Because the bone AND the tendon are involved, they can be tricky to treat and often take longer.
The symptoms will typically involve pain on initial weight-bearing in the morning, that warms up within 30mins. It may also warm up when beginning running/sport then come on again after a period of activity. They can often ache afterwards.
Unlike a traditional achilles problem, they won’t respond to eccentric calf raises off the edge of a step. You generally have to start with higher range work right up on your toes before slowly dropping down lower as the pain improves. In serious cases, a heel raise worn for a short period can also help settle it down before starting some strength work.
Posterior Ankle impingement
In athletes such as ballet dancers where activity requires frequent rising up onto the tip toes they could experience a syndrome called posterior ankle impingement. This is where both hard and soft tissue can get stuck or “pinched” at the back of the ankle.
Posterior ankle impingement occurs when excessive plantaflexion (pointing the foot) pinches the soft tissue or compresses the back of the joint resulting in a sharp pinching pain.

Os Trigonum at the back of the talus bone.
There are 2 anatomical variations that cause posterior ankle impingement.
- Prominent Posterior Talus. The talus is the main weight-bearing bone in your ankle. The back of this bone can grow in response to abnormal loading. If it grows too much it can start to irritate structures at the back of the ankle.
- Os Trigonum. If the prominent part of the talus grows enough and then breaks off, it becomes labeled as on Os Trigonum. About 20-30% of the population have an os trigonum, with obviously not everyone having symptoms. If however, it does start to cause symptoms, then surgery to remove the loose bone can be highly effective. You can read more about it here https://www.peterlam.com.au/procedures/arthroscopy-of-the-ankle-and-foot/
Both of these anatomical variations can be diagnosed with a plain x-ray.
Treatment will likely include strengthening of the deep muscles in the lower leg such as tibilalis posterior, flexor digitorium longus, flexor hallicus longus and the peroneals.
Severs disease
Sounds “severe” but it’s not! Severs disease an “apophysitis”, or an inflammation/irritation of where the achilles tendon attaches to the back of the heel. When we’re younger, our bones are a bit softer, so repetitive pulling of the achilles tendon on the bone can cause some pain.
Severs disease is more common in boys than girls, aged 8-14 yrs. The typical presentation is pain caused by running, jumping and the pain gets worse with more activity then settles with rest. It often coincides with a growth spurt. As the bones grow, our muscles and tendons can sometimes struggle to keep up, so they get tighter and start to pull on the attachment.
Treatment of Severs disease involves rest from running and jumping until the pain settles, then addressing any tightness and/or weakness of the calf muscles. Sometimes a gel heel cup in the shoe will help offload the attachment. In serious cases, a boot may be required to be worn for 2-4 weeks.
Sural nerve compression

There is a little nerve that runs in behind the heel and tracks towards the outside of the ankle called the Sural nerve. It can be irritated by inflammation from surrounding tissues and normally exists with one of the other pathologies mentioned above or can occur after an ankle sprain (click here for ankle sprain management tips)
The sural nerve will obviously give you nerve pain, which feels very different. Common symptoms of nerve pain are “burning”, “tingling” and “numbness”. We can test the nerve with a nerve tension test and this will reproduce the same pain you are having.
Treatment will normally involve addressing the other problems in the area as well as nerve glides which can help restore mobility to the nerve.
Haglunds Deformity
Haglunds Deformity is a growth at the back of the calcaneuous that causes pain and swelling in the bursa (retrocalcaneal bursitis) and the achilles tendon.
The bone grows due to repetitive stress over the years and can be aggravated by resting the heel on a table or from wearing shoes with a firm heel support.
Treatment involves anti-inflammatories, choosing footwear that doesn’t compress the back of the heel, calf and foot strengthening
and a heel raise to offload the tendon and bursa. In serious cases that fail to improve, surgery may be required to remove the bony enlargement.
Calcaneal bone stress/fracture
A bone stress injury or fracture of the heel is rare and makes it almost impossible to weight-bear.
Pain with weight-bearing, likely with a history of increased load or overload. This one is needed to be confirmed by MRI and you will likely end up with a very fashionable moon boot for 6-8 weeks.
If any of these sound like your pain, then please don’t hesitate to get it seen to quickly.
Ankle and Knee Stability and Landing Exercises
These are slightly more advanced exercises to perform after any ankle or knee injury for those wishing to return to sporting activities.
Ankle sprains – Assessment and Treatment
Ankle sprains or “inversion injuries” are one of the most common injuries experienced by recreational and elite athletes, accounting for approximately 10-30% of all sports related injuries across a number of sports including soccer, netball, basketball and rugby.
How does an ankle sprain occur?
An ankle sprain generally occurs when the ankle “rolls” inwards, as a result of uneven playing surfaces, landing awkwardly following a jump or changing direction. The ligaments, tendons and joint capsule on the outside of the ankle are stretched beyond their capacity, causing injury.
Anatomy
Approximately 85% of all ankle sprains occur to the lateral ligament complex which is comprised of the anterior talofibular ligament (ATFL), joint capsule, calcaneofibular ligament (CFL) and the posterior talofibular ligament (PTFL) (See picture below).
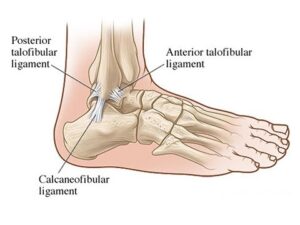
The ATFL is involved in the majority of lateral ankle sprains; the CFL in approximately 40% and the PTFL in less than 10% of all injuries.
How do I know if I have rolled or sprained my ankle?
Following an acute ankle sprain, pain is generally felt on the outside of your ankle which is often accompanied by immediate swelling, which can be localised to the ankle or present in the foot and toes depending on the severity of your injury. There is also often bruising or skin discolouration on the inside and/or outside of the foot, however this has not been shown to determine the severity of your injury or indicative of a fracture to one of the bones in your ankle or foot.
How do I know if it’s more serious than just a sprain?
The Ottawa ankle rules are accurate guidelines that are used by doctors and physiotherapists to determine whether or not an x-ray should be obtained following an ankle sprain. These guidelines include:
- Younger than 16 OR older than 55 years of age (as their bones are softer)
- Bone tenderness of the medial or lateral malleolus, navicular or base of the 5th metatarsal (pictured below)
- Unable to weight bear immediately after the injury for 4 steps
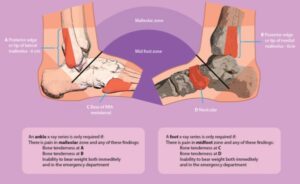
Less than 15% of all ankle sprains result in a fracture, so if you suspect you may have suffered one see your doctor or physiotherapist for a thorough assessment and referral for an x-ray of your ankle or foot.
What’s the best early management of my ankle sprain?
Right after an ankle injury, the most important thing you can do is try to reduce your pain and inflammation as fast as possible. This is best achieved by following the PRICER protocol, which includes:
-
Protection – Avoid activities that may cause further damage or pain
-
Relative rest – Avoid activities that cause pain to the area but don’t avoid moving the ankle as this will slow the recovery process (let pain be your guide)
-
Ice – Apply an ice pack for 20 minutes every 1-2 hours for the first 72 hours
-
Compression – Apply a compression bandage to minimise and control swelling
-
Elevation – Elevate the ankle above the level of your heart
-
Referral – Medical assistance should be sought as soon as possible to determine the extent of the injury and develop a rehabilitation plan for full recovery return to sport.
Medications such as Panadol may also be necessary to control pain, however research suggests that anti-inflammatory medications should not be used within the first 72 hours as they can impact the normal inflammatory process which is essential for healing, we want to control the swelling, not stop it completely!
What will my rehabilitation consist of?
Adequate rehabilitation following an ankle sprain is very important. Recent studies have shown that not only do 30% of individuals who suffer ankle sprains end up with persistent symptoms such as pain and swelling but 20% also have recurrent episodes of ankle sprains, so rehabilitation is vital to not only reduce symptoms and return you to full function but also to prevent re-occurrence of future ankle sprains.
Physiotherapy will include a thorough assessment of your ankle and foot to determine what structures have been injured. Treatment can start on day 1 and will depend on the type of injury you have sustained but will normally include:
-
Management of pain and swelling (strapping/bracing)
-
Hands-on manual therapy in order to restore normal joint movement
-
An individually tailored rehabilitation program to restore flexibility, strength and proprioception (balance) as well as prevent future injuries
-
Sports specific exercises to ensure safe return to sport
-
Advice on how maintain your fitness throughout the rehabilitation process
How long will it take to recover?
Every ankle sprain is different and the recovery time and return to sport will vary depending on individual factors such as effective early management, the extent of the injury, previous history of injury and underlying flexibility, strength and proprioception issues. However, as a rough guide mild ankle sprains with minimal fibre damage generally take 2-4 weeks, moderate ankle sprains 4-6 weeks and severe ankle sprains with complete ligament ruptures and/or fractures 6-12 weeks for full recovery.
For any further information, please do not hesitate to contact us at Clinical Physio, St Ives clinicalphysiostives.com.au
A Runners Guide to Shin Splints
Medial Tibial Stress Syndrome (MTSS) or “shin splints” is one of the most commonly reported lower limb injuries by competitive and recreational athletes. Recent research has shown that shin splints affects approximately 20% of the running population, with the majority of sufferer’s partaking in long distance training/competition.
What causes the pain?
Currently, there is two widely accepted theories on the cause of shin splints:
- The bony bending/bowing theory
- The traction theory
The bony bending theory suggests that during running, the Tibia (shin bone) bends due to the stress placed upon it. This bending causes small amounts of strain in the bone that enables it to adapt and get stronger (a good thing!!). When this strain exceeds the adaption process the shin bone becomes overloaded (a bad thing!), subsequently leading to injury and pain.
The traction theory states that shins splints is caused by the continual contraction of the muscles (Soleus, Flexor Digitorum Longus & Tibialis Posterior) that attach to the inner border of the shin. As these muscles contract during running, they place a traction stress on the shin bone, which results in inflammation at their attachment onto the bone, causing pain.
Am I at risk?
Current research has identified several risk factors leading to an increased likelihood of developing shin splints. These include:
-
A previous history of shin splints
- Prior orthotic use
-
High Body Mass Index (BMI)
-
Female gender
-
Decreased running experience
-
Decreased running cadence (step rate)
-
Excessive pronation
- Over striding
-
Crossover running style
-
Increased vertical oscillation (ground clearance)
-
Forefoot running
How do I know if I have shin splints?
To diagnose shin splints accurately, two symptoms must be present:
- Exercise induced pain along the distal 2/3 of the medial Tibial border
- Recognisable pain produced by pressing the medial Tibial border, which spans a distance of 5cm or more.
If you are experiencing symptoms not typical of shin splints such as cramping, pain spanning less than 5cm, burning pain, numbness or pins and needles, you should seek a thorough assessment by a physiotherapist to properly diagnose and treat your condition.
Treatment – Technique Technique Technique!!!
Arguably one of the biggest contributors to the development of shin splints in a runner is their running technique, particularly their lower limb mechanics. One of the quickest ways to reduce shin splints related pain is to address the technical aspects of running that can contribute to increased stress across the Tibia and associated musculature. What you should focus on is:
- Cadence – Normal cadence should be between 165-185steps/min. Decreased Cadence causes increased ground contact time resulting in prolonged pronation and excessive tibial torsion stress.
- Over striding – Excessive stride length results in poor tibia positioning upon heel strike, increasing Soleal traction and reducing force absorption ability.
- Cross Over Gait – Landing across the midline of the body causes excessive tibial torsion and pronation, reducing proper force attenuation.
- Vertical Oscillation – Increased vertical oscillation during running increases Tibial impact forces and often results in a loud foot strike.
How do I improve my technique?
Increase your cadence!! – This is by far the biggest bang for your buck. Increasing your cadence by approximately 10%:
-
Reduces lower limb impact forces by 20%
- Reduces vertical oscillation
-
Reduces ground contact time
-
Reduces stride length
The best way to achieve an increase in your cadence is by using GPS watches, phone applications or by simply running on a treadmill.
Eliminate a crossover running style – On a track, run straddling a line across 2 lanes or alternatively, try and maintain a space between your knees with every stride.
How to beat shin splints using strength
Strength exercises for shin splints should aim to improve the localised muscular capacity of the calf complex as well as the bone load capacity of the Tibia. This is best addressed with weight bearing functional exercises that mimic running postures.
One of the most important and often forgotten muscles of the calf complex is the Soleus. The soleus muscle is vital for absorbing excessive loads placed on the Tibia during running by minimising excessive pronation as well as resisting the bending forces experienced by the Tibia due to ground impact.
The best Soleus exercise that runners can do is the Bent Knee calf raise (pictured above). To perform the exercise correctly:
-
Bend your knee as far forward as possible, keeping your foot flat on the floor
- Keeping your knee bent, raise yourself up onto your toes
-
Lower your heel back to the ground
Perform 3 sets of 15 repetitions in a slow and controlled manner.
As always, if you are having problems, please do not hesitate to contact one of our experienced physiotherapists.
Single Leg Squat Progressions
The single leg squat is a basic but fantastic measure of overall function of the lower limb. It tests both strength and flexibility of the ankle, knee and hip. Having a good single leg squat can dramatically reduce your risk of sustaining a lower limb injury.
The 3 main points we look for are:
- Does the knee track straight forward over the toes (good) or does it collapse inwards (poor)?
- Does the trunk stay centred over the foot (good) or does it sway out to the side (poor)?
- Is there an even contribution from ankle, knee and hip (good) or is there a preference/dominance of one of the joints (poor)?
- Polkadot socks essential!