Ankle sprains or “inversion injuries” are one of the most common injuries experienced by recreational and elite athletes, accounting for approximately 10-30% of all sports related injuries across a number of sports including soccer, netball, basketball and rugby.
How does an ankle sprain occur?
An ankle sprain generally occurs when the ankle “rolls” inwards, as a result of uneven playing surfaces, landing awkwardly following a jump or changing direction. The ligaments, tendons and joint capsule on the outside of the ankle are stretched beyond their capacity, causing injury.
Anatomy
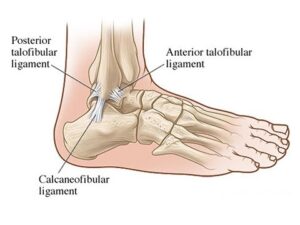
Approximately 85% of all ankle sprains occur to the lateral ligament complex which is comprised of the anterior talofibular ligament (ATFL), joint capsule, calcaneofibular ligament (CFL) and the posterior talofibular ligament (PTFL) (See picture below).
The ATFL is involved in the majority of lateral ankle sprains; the CFL in approximately 40% and the PTFL in less than 10% of all injuries.
How do I know if I have rolled or sprained my ankle?
Following an acute ankle sprain, pain is generally felt on the outside of your ankle which is often accompanied by immediate swelling, which can be localised to the ankle or present in the foot and toes depending on the severity of your injury. There is also often bruising or skin discolouration on the inside and/or outside of the foot, however this has not been shown to determine the severity of your injury or indicative of a fracture to one of the bones in your ankle or foot.
How do I know if it’s more serious than just a sprain?
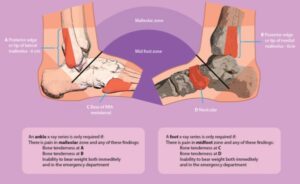
The Ottawa ankle rules are accurate guidelines that are used by doctors and physiotherapists to determine whether or not an x-ray should be obtained following an ankle sprain. These guidelines include:
Younger than 16 OR older than 55 years of age (as their bones are softer)
Bone tenderness of the medial or lateral malleolus, navicular or base of the 5th metatarsal (pictured below)
Unable to weight bear immediately after the injury for 4 steps
Less than 15% of all ankle sprains result in a fracture, so if you suspect you may have suffered one see your doctor or physiotherapist for a thorough assessment and referral for an x-ray of your ankle or foot.
What’s the best early management of my ankle sprain?
Right after an ankle injury, the most important thing you can do is try to reduce your pain and inflammation as fast as possible. This is best achieved by following the PRICER protocol, which includes:
Protection – Avoid activities that may cause further damage or pain
Relative rest – Avoid activities that cause pain to the area but don’t avoid moving the ankle as this will slow the recovery process (let pain be your guide)
Ice – Apply an ice pack for 20 minutes every 1-2 hours for the first 72 hours
Compression – Apply a compression bandage to minimise and control swelling
Elevation – Elevate the ankle above the level of your heart
Referral – Medical assistance should be sought as soon as possible to determine the extent of the injury and develop a rehabilitation plan for full recovery return to sport.
Medications such as Panadol may also be necessary to control pain, however research suggests that anti-inflammatory medications should not be used within the first 72 hours as they can impact the normal inflammatory process which is essential for healing, we want to control the swelling, not stop it completely!
What will my rehabilitation consist of?
Adequate rehabilitation following an ankle sprain is very important. Recent studies have shown that not only do 30% of individuals who suffer ankle sprains end up with persistent symptoms such as pain and swelling but 20% also have recurrent episodes of ankle sprains, so rehabilitation is vital to not only reduce symptoms and return you to full function but also to prevent re-occurrence of future ankle sprains.
Physiotherapy will include a thorough assessment of your ankle and foot to determine what structures have been injured. Treatment can start on day 1 and will depend on the type of injury you have sustained but will normally include:
Management of pain and swelling (strapping/bracing)
Hands-on manual therapy in order to restore normal joint movement
An individually tailored rehabilitation program to restore flexibility, strength and proprioception (balance) as well as prevent future injuries
Sports specific exercises to ensure safe return to sport
Advice on how maintain your fitness throughout the rehabilitation process
How long will it take to recover?
Every ankle sprain is different and the recovery time and return to sport will vary depending on individual factors such as effective early management, the extent of the injury, previous history of injury and underlying flexibility, strength and proprioception issues. However, as a rough guide mild ankle sprains with minimal fibre damage generally take 2-4 weeks, moderate ankle sprains 4-6 weeks and severe ankle sprains with complete ligament ruptures and/or fractures 6-12 weeks for full recovery.
For any further information, please do not hesitate to contact us at Clinical Physio, St Ives clinicalphysiostives.com.au
Medial Tibial Stress Syndrome (MTSS) or “shin splints” is one of the most commonly reported lower limb injuries by competitive and recreational athletes. Recent research has shown that shin splints affects approximately 20% of the running population, with the majority of sufferer’s partaking in long distance training/competition.
What causes the pain?
Currently, there is two widely accepted theories on the cause of shin splints:
The bony bending/bowing theory
The traction theory
The bony bending theory suggests that during running, the Tibia (shin bone) bends due to the stress placed upon it. This bending causes small amounts of strain in the bone that enables it to adapt and get stronger (a good thing!!). When this strain exceeds the adaption process the shin bone becomes overloaded (a bad thing!), subsequently leading to injury and pain.
The traction theory states that shins splints is caused by the continual contraction of the muscles (Soleus, Flexor Digitorum Longus & Tibialis Posterior) that attach to the inner border of the shin. As these muscles contract during running, they place a traction stress on the shin bone, which results in inflammation at their attachment onto the bone, causing pain.
Am I at risk?
Current research has identified several risk factors leading to an increased likelihood of developing shin splints. These include:
A previous history of shin splints
Prior orthotic use
High Body Mass Index (BMI)
Female gender
Decreased running experience
Decreased running cadence (step rate)
Excessive pronation
Over striding
Crossover running style
Increased vertical oscillation (ground clearance)
Forefoot running
How do I know if I have shin splints?
To diagnose shin splints accurately, two symptoms must be present:
Exercise induced pain along the distal 2/3 of the medial Tibial border
Recognisable pain produced by pressing the medial Tibial border, which spans a distance of 5cm or more.
If you are experiencing symptoms not typical of shin splints such as cramping, pain spanning less than 5cm, burning pain, numbness or pins and needles, you should seek a thorough assessment by a physiotherapist to properly diagnose and treat your condition.
Treatment – Technique Technique Technique!!!
Arguably one of the biggest contributors to the development of shin splints in a runner is their running technique, particularly their lower limb mechanics. One of the quickest ways to reduce shin splints related pain is to address the technical aspects of running that can contribute to increased stress across the Tibia and associated musculature. What you should focus on is:
Cadence – Normal cadence should be between 165-185steps/min. Decreased Cadence causes increased ground contact time resulting in prolonged pronation and excessive tibial torsion stress.
Over striding – Excessive stride length results in poor tibia positioning upon heel strike, increasing Soleal traction and reducing force absorption ability.
Cross Over Gait– Landing across the midline of the body causes excessive tibial torsion and pronation, reducing proper force attenuation.
Vertical Oscillation– Increased vertical oscillation during running increases Tibial impact forces and often results in a loud foot strike.
How do I improve my technique?
Increase your cadence!! – This is by far the biggest bang for your buck. Increasing your cadence by approximately 10%:
Reduces lower limb impact forces by 20%
Reduces vertical oscillation
Reduces ground contact time
Reduces stride length
The best way to achieve an increase in your cadence is by using GPS watches, phone applications or by simply running on a treadmill.
Eliminate a crossover running style – On a track, run straddling a line across 2 lanes or alternatively, try and maintain a space between your knees with every stride.
How to beat shin splints using strength
Strength exercises for shin splints should aim to improve the localised muscular capacity of the calf complex as well as the bone load capacity of the Tibia. This is best addressed with weight bearing functional exercises that mimic running postures.
One of the most important and often forgotten muscles of the calf complex is the Soleus. The soleus muscle is vital for absorbing excessive loads placed on the Tibia during running by minimising excessive pronation as well as resisting the bending forces experienced by the Tibia due to ground impact.
The best Soleus exercise that runners can do is the Bent Knee calf raise (pictured above). To perform the exercise correctly:
Bend your knee as far forward as possible, keeping your foot flat on the floor
Keeping your knee bent, raise yourself up onto your toes
Lower your heel back to the ground
Perform 3 sets of 15 repetitions in a slow and controlled manner.
As always, if you are having problems, please do not hesitate to contact one of our experienced physiotherapists.
Vas Krishnan is in his final year of Sports & Exercise Science at the University of Sydney.
Stephen Andreazza is a Titled Sports & Musculoskeletal Physiotherapist.
Lets face it, injuries are annoying and expensive. They result in lost hours of training and game time as well as dollars spent on physio, doctors and imaging, and in some cases, surgery. So what are the best ways to prevent injury? We highlight the key points taken from the most recent research as well as from Leicester City’s incredible Premier League Title in 2016.
The top 3 Injury Prevention strategies are:
Measure/track your workload and training
Gradually increase your training
Be specific in your training
1) Measuring your workload
Training/exercise load is emerging in the research as the most significant predictor of injury in the athletic population.
“Load” definition
Workload is all things affecting the body in a sporting context. This could be internal measures which are mainly physiological or external measures which are physical work performed. [8]
Internal Load Measures
Rate of perceived exertion (RPE)
Heart Rate (HR)
Blood Lactate Concentration
Stress/Arousal
External Load Measures
Weight Lifted (total Kg)
Total Distance (Km)
Acceleration/Deceleration (m)
Minutes on ground (training and game time)
When quantifying workload for usable data we usually use at least one Internal load to determine intensity (e.g. RPE) and one external load to determine physical work done (e.g. Total Distance) these together help us to quantify total load (Internal load x external Load = total load).
It was found that using an internal load and an external load measure was more effective in determining the actual load an athlete was undertaking compared to just the external load. [8]
An Example of weekly workload
Calculating Load for a soccer player could be as simple as Minutes on ground x RPE. If a soccer player trained 3 times per week and had 1 game on the weekend where the sessions went for 60min each and their game time on game day was 60min. For Training sessions RPE was 6 and game day RPE was 8.
Session 1 – 60×6 = 360 Units
Session 2 – 60×6 = 360 Units
Session 3 – 60×6 = 360 Units
Game 1 – 60 x 8 = 480 Units
Total Weekly Load = 360+360+360+480 = 1560 Units
2) Gradually increase your training. Use your load measurements to work out how much is too much.
Acute: Chronic Workload Ratio
The Acute: Chronic Workload Ratio is a way for athletes and coaches to determine the load their athletes should do for current and future training as to prevent injury. If load is considered to be km running/week. Acute load is Km over 1 week and Chronic load Km over 4 weeks. [5]
Using the Acute: Chronic Workload Ratio we can quantify expected and required load for decreased injury risk. [5]
It was found that when the Acute: Chronic workload ratio was greater than 1.5 there was an increase in the risk of injury. This can be clearly seen in the graph below. [5]
It was also found that >0.8 to <1.3 was the point of least injury risk. This was noted as the “sweet spot” and should be what all athletes are aiming to be in at all points of the season. [5]
>1.3 is where the risk of injury started to increase with a significant increase at 1.5 and an even greater increase at 2.0. [5]
Coaches and Athletes can use this as a guideline to determine the load that they should be using for transitioning season to season, coming back from injury or even coming back from holidays/time off. This can help the athlete and coach with injury prevention strategies, re-injury and further progression. [5]
Using the Acute: Chronic Workload Ratio
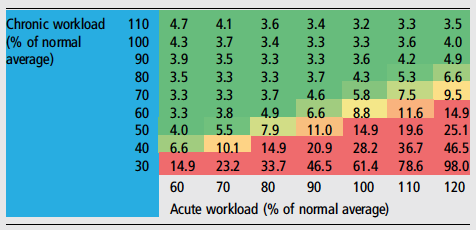
Below is a table illustrating what the likelihood of injury is for an athlete in accordance with the Acute:Chronic workload ratio. [1]
This table compares different scenarios of acute and chronic workloads using predefined equations to determine load as a percentage of normal training.[1]
The table grades each load percentage with a percent likelihood of injury. [1]
For example if an athlete has come back from a holiday and resumed normal 100% load (Acute workload) but over the past 4 weeks has only been training at 30% of their normal load (Chronic Workload) there can be an expected 61.4% increased likelihood of injury in the following week. [1]
Athletes and coaches can use this table to determine the load they should be working at or if they are at a greater risk of injury. [1]
So, how much is too much!?
Acute: Chronic workload ratio should not exceed 1.3 or go below 0.8 (>0.8-<1.3) – aka “the sweet spot”
Likelihood of injury increases when the Acute: Chronic workload ratio is >1.3
Danger Zone for Injury when Acute: Chronic workload ratio is >1.5
Severe Danger Zone for injury when Acute: Chronic workload ration is >2.0 (greatest risk of injury)
The amount of “Load” that is too much is determined by how much you have been doing in the previous weeks.
An elite athlete training 6+ times per week will have a vastly different load to a high school athlete training 3 times per week, however we want their Acute: Chronic Workload Ratios to be the same!
Leicester City’s exercise scientists and coaches were meticulous about manage player loads. They used GPS tracking as one of a few tools to measure each players load.
If a player had spike in their workload, the coaches were notified and the player was pulled from the next session and sent for recovery work.
3) Be Specific in your training
This sounds so simple but we see people get it wrong all the time.
Athletes or Individuals wanting to compete in particular events must ensure they are training specific to that event. For example if you wanted to run a half marathon, you need to run! You don’t need to be in the pool swimming or doing reps on the bike.
You can start by running small distances and build your way up to 21 km. Using the Acute: Chronic Workload ratio and increasing your distance/load by 10% per week you can safely build your load and compete in the half marathon at your best.
Leicester City was specific in their injury prevention strategies. They identified that the most common injury was a hamstring strain and that these occurred in the last 20mins of a game when a player is trying to sprint under fatigue. They used 2 training methods to specifically address this.
They made their players do repeat 40metre sprints at the end of every training session when they were fatigued.
Every player had to reach and maintain a certain strength target of their hamstrings and this was measured using a device called the NORDBORD.
At the end of the season, Leicester City had the least number of injuries in the league and also had the greatest number of counter attacking goals in the league. [7]
If all of this is still confusing to you (you’re probably not alone!) then at least try to stick to these simple guidelines.
Keep a diary of how much training you do.
Increase your training loads gradually, particularly if your new to a sport, or coming back from a break. Keep your increases to around 10% per week.
Be specific in your training. If you’re training for a run, then run!
If you’re still unsure, then please don’t hesitate to contact our friendly team at clinicalphysiostives.com.au
Key Evidence
Drew et al. (2016)
Load Management is Critical for all types of Injury Prevention. This was found in relation to both specific pathologies/injuries and in controlling injury risk factors.
Murray et al. (2016)
Sudden increases in Acute workload were found to have a significant relation to injury in the current and subsequent weeks of increased load. High Chronic workloads were found to have a protective affect against injury. Hence the need for monitoring of both Acute and Chronic Load, and the Acute:Chronic Load Ratio.
Blanch et al. (2015)
“The Acute: Chronic Workload ratio should be included in the return to sport decision-making process” (1. p.475)
Reference List:
Blanch, P., & Gabbett, T. (2015). Has the athlete trained enough to return to play safely? The acute:chronic workload ratio permits clinicians to quantify a player’s risk of subsequent injury. British Journal Of Sports Medicine, 50(8), 471-475. http://dx.doi.org/10.1136/bjsports-2015-095445
Bowen, L., Gross, A., Gimpel, M., & Li, F. (2016). Accumulated workloads and the acute:chronic workload ratio relate to injury risk in elite youth football players. British Journal Of Sports Medicine, 51(5), 452-459. http://dx.doi.org/10.1136/bjsports-2015-095820
Drew, M., & Finch, C. (2016). The Relationship Between Training Load and Injury, Illness and Soreness: A Systematic and Literature Review. Sports Medicine, 46(6), 861-883. http://dx.doi.org/10.1007/s40279-015-0459-8
Drew, M., Cook, J., & Finch, C. (2016). Sports-related workload and injury risk: simply knowing the risks will not prevent injuries: Narrative review. British Journal Of Sports Medicine, 50(21), 1306-1308. http://dx.doi.org/10.1136/bjsports-2015-095871
Gabbett, T. (2016). The training—injury prevention paradox: should athletes be training smarterandharder?. British Journal Of Sports Medicine, 50(5), 273-280. http://dx.doi.org/10.1136/bjsports-2015-095788
Murray, N., Gabbett, T., Townshend, A., Hulin, B., & McLellan, C. (2016). Individual and combined effects of acute and chronic running loads on injury risk in elite Australian footballers. Scandinavian Journal Of Medicine & Science In Sports, 27(9), 990-998. http://dx.doi.org/10.1111/sms.12719
Weaving, D., Marshall, P., Earle, K., Nevill, A., & Abt, G. (2014). Combining Internal- and External-Training-Load Measures in Professional Rugby League. International Journal Of Sports Physiology And Performance, 9(6), 905-912. http://dx.doi.org/10.1123/ijspp.2013-0444
Patellofemoral Pain Syndrome (PFPS) or “Runners Knee” is one of the most common overuse injuries amongst the active population. PFPS accounts for approximately 15% of all knee pain, with females and young adults being 2 times more likely to develop symptoms due to PFPS (Boling et al, 2010).
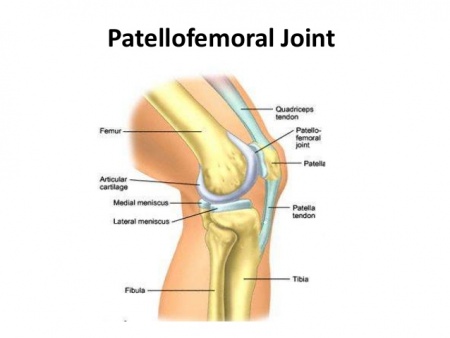
What is the Patello-Femoral Joint?
The Patello-femoral joint is one of two joints that make up the knee (see figure 1). It is comprised of the kneecap (patella) and the thigh bone (femur) and provides the attachment sites for our quadriceps and patella tendons.
How do I know if I have PFPS?
PFPS is characterised as “pain experienced around or behind the knee cap, which is aggravated by weight bearing activities that require a flexed knee such as squatting, running, jumping and hopping” (Crossley et al, 2016). It is not uncommon to also experience symptoms such as:
Creaking/grinding sensations around the knee cap
Swelling around the knee
Pain provoked by pressing the knee cap
Pain bought on by non-weight bearing activities such as sitting
Figure 1. Patello-Femoral Joint
How did I get PFPS?
Runners often develop PFPS due to a combination of several factors such as:
Muscular weakness (Quadriceps/Glutes)
Muscular tightness
Changes to training loads
Inappropriate footwear
Anatomical variations in knee cap shape/position
Changes to running style
Biomechanical abnormalities
What can I do to recover?
Currently, the best treatment supported by research is STRENGTH!!!
Strength interventions have been shown to be most effective in relieving pain and improving function in individuals with PFPS. Exercise selection should be patient specific and target the hip external rotators/hip abductors (Glut Medius) as well as the knee extensor muscles (Quadriceps) due to their roles in knee biomechanics (Martin et al, 2018).
The great news is approximately 90% of individuals suffering from PFPS will be completely symptom free within 6 weeks of starting a strength rehabilitation program guided by a physiotherapist.
What won’t work long term?
Amongst the literature there is a lack of strong evidence, supporting the long-term use of:
Although the majority of these things can help your pain in the short term, none have been shown to be superior to strength exercises of the quadriceps and gluteal musculature.
It hurts to run….what can I do?
Research on running mechanics has shown that stress on the Patello-femoral joint is greatest during mid stance and exceeds approximately 7x your body weight. This can be largely increased with
Slower speeds of running (Increase knee flexion)
Large vertical oscillation
Cross over style running
Excessive body twisting
Excessive body twisting
Ways in which you can alter your running technique to reduce knee joint stress by 15-20% are:
Maintain space between your knees when running (knee window)
Increase running cadence by 10%
Minimise excessive body twisting
How can I prevent getting sore knees?
Currently the best evidence for preventing future patella issues besides maintaining your strength is by assessing and monitoring acute: chronic training volumes in term of distance covered (Km). Acute increases in training volume should be no greater than a factor of 1.5 or you place yourself at an increased risk of suffering a subsequent injury.
We have covered this in depth in our blog titled Our Top 3 injury prevention strategies, which can be accessed by the link below:
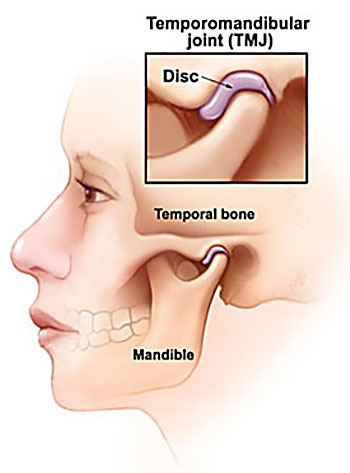
Does your jaw click? Do you grind your teeth or wake up in the morning with sore teeth? Does it hurt to open your mouth all the way? Or hurt to chew? These are all signs that there may be an issue with your temporomandibular joint (TMJ).
Simple Anatomy
The TMJ is a common, yet poorly understand cause of headache and neck pain. It is actually a fairly simple structure and acts like many other joints in the body with surrounding muscles acting on the joint to produce movement up and down and side to side. It has a small disc inside the joint that allows for smooth movement of the joint. It is this disc translating forwards/backwards that can cause “clicking” when you open and close.
Cause of pain in the TMJ
There are 2 main structures which are sources of pain in the TMJ.
1) The muscles – in particular the large masseter muscle that sits on the outside of the jaw. If you place a finger on the outside of your jaw and clench, you can feel this muscle bulge into your finger. The other muscles are the medial and lateral pterygoid muscles which sit inside the mouth and help to open and close and move the jaw forwards. These muscles can either get tight/overworked (particularly if your stressed) or can also become weak.
A recently published study by Greenbaum et al (2021) found that the muscles of the TMJ are the primary cause of headache from TMJ disorders and 38% patients with muscular TMJ disorders will develop headache.
2) The Joint, including the small disc that sits inside the joint. The joint has 2 main movements. 1 is to “roll” open and closed and the other is movement side to side. The disc helps to cushion the joint when we clench and also aids the lubrication of the joint.
The joint can become painful either due to trauma, developing poor chewing mechanics or, again, if there is some underlying stress/anxiety causing jaw clenching at night. Greenbaum’s conclusions also found that if the primary cause of jaw pain is from the joint, there is almost a 0% chance that you will develop a headache.
How can the TMJ cause a headache?
As stated above, the muscles of the TMJ are the primary cause of headache. These muscles can refer into the head due to a phenomena known as “convergence”. This is where the nerves that supply the jaw muscle (in blue in the pic below) converge/communicate via the same nerves that supply the head (in green and orange).
All these nerves share a common central nucleus, almost like a roundabout, where these nerves all meet then go there separate ways again. Our brains can get a little confused as to the source, so we end up experiencing pain in both the jaw and the head.
Treatment
Treatment really depends on what we find during the assessment. For example, in order to assess for muscle weakness or overactivity of the pterygoids we conduct some specific movement and strength tests. If we do find an issue with overactivity, then we may do a muscle release on the pterygoids then reassess your jaw movement again.
The can also be a link between poor posture and TMJ pain. This test to determine if there is a link is quite simple. We place the patient in a “poor posture” position i.e. slumped with head forward and ask them to open and close. We then place the patient in an upright position, with head back and ask them to open and close again. If posture is contributing to the symptoms, the patient will report less pain and also be able to open their jaw further.
If you do have jaw pain, or potentially a headache that you now think might be originating from your jaw, please don’t hesitate to get in touch with us at clinicalphysiostives.com.au