
About the authors.
Vas Krishnan is in his final year of Sports & Exercise Science at the University of Sydney.
Stephen Andreazza is a Titled Sports & Musculoskeletal Physiotherapist.
Lets face it, injuries are annoying and expensive. They result in lost hours of training and game time as well as dollars spent on physio, doctors and imaging, and in some cases, surgery. So what are the best ways to prevent injury? We highlight the key points taken from the most recent research as well as from Leicester City’s incredible Premier League Title in 2016.
The top 3 Injury Prevention strategies are:
- Measure/track your workload and training
- Gradually increase your training
- Be specific in your training
1) Measuring your workload
- Training/exercise load is emerging in the research as the most significant predictor of injury in the athletic population.
“Load” definition
Workload is all things affecting the body in a sporting context. This could be internal measures which are mainly physiological or external measures which are physical work performed. [8]
Internal Load Measures
- Rate of perceived exertion (RPE)
- Heart Rate (HR)
- Blood Lactate Concentration
- Stress/Arousal
External Load Measures
- Weight Lifted (total Kg)
- Total Distance (Km)
- Acceleration/Deceleration (m)
- Minutes on ground (training and game time)
When quantifying workload for usable data we usually use at least one Internal load to determine intensity (e.g. RPE) and one external load to determine physical work done (e.g. Total Distance) these together help us to quantify total load (Internal load x external Load = total load).
It was found that using an internal load and an external load measure was more effective in determining the actual load an athlete was undertaking compared to just the external load. [8]
An Example of weekly workload
Calculating Load for a soccer player could be as simple as Minutes on ground x RPE. If a soccer player trained 3 times per week and had 1 game on the weekend where the sessions went for 60min each and their game time on game day was 60min. For Training sessions RPE was 6 and game day RPE was 8.
Session 1 – 60×6 = 360 Units
Session 2 – 60×6 = 360 Units
Session 3 – 60×6 = 360 Units
Game 1 – 60 x 8 = 480 Units
Total Weekly Load = 360+360+360+480 = 1560 Units
2) Gradually increase your training. Use your load measurements to work out how much is too much.
Acute: Chronic Workload Ratio
The Acute: Chronic Workload Ratio is a way for athletes and coaches to determine the load their athletes should do for current and future training as to prevent injury. If load is considered to be km running/week. Acute load is Km over 1 week and Chronic load Km over 4 weeks. [5]
Using the Acute: Chronic Workload Ratio we can quantify expected and required load for decreased injury risk. [5]
It was found that when the Acute: Chronic workload ratio was greater than 1.5 there was an increase in the risk of injury. This can be clearly seen in the graph below. [5]

It was also found that >0.8 to <1.3 was the point of least injury risk. This was noted as the “sweet spot” and should be what all athletes are aiming to be in at all points of the season. [5]
>1.3 is where the risk of injury started to increase with a significant increase at 1.5 and an even greater increase at 2.0. [5]
Coaches and Athletes can use this as a guideline to determine the load that they should be using for transitioning season to season, coming back from injury or even coming back from holidays/time off. This can help the athlete and coach with injury prevention strategies, re-injury and further progression. [5]
Using the Acute: Chronic Workload Ratio
Below is a table illustrating what the likelihood of injury is for an athlete in accordance with the Acute:Chronic workload ratio. [1]
This table compares different scenarios of acute and chronic workloads using predefined equations to determine load as a percentage of normal training.[1]
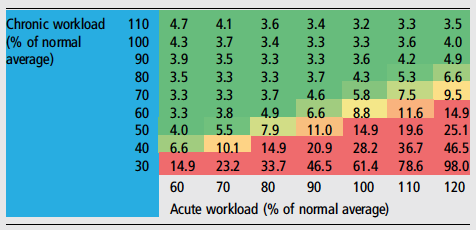
The table grades each load percentage with a percent likelihood of injury. [1]
For example if an athlete has come back from a holiday and resumed normal 100% load (Acute workload) but over the past 4 weeks has only been training at 30% of their normal load (Chronic Workload) there can be an expected 61.4% increased likelihood of injury in the following week. [1]
Athletes and coaches can use this table to determine the load they should be working at or if they are at a greater risk of injury. [1]
So, how much is too much!?
-
Acute: Chronic workload ratio should not exceed 1.3 or go below 0.8 (>0.8-<1.3) – aka “the sweet spot”
-
Likelihood of injury increases when the Acute: Chronic workload ratio is >1.3
-
Danger Zone for Injury when Acute: Chronic workload ratio is >1.5
-
Severe Danger Zone for injury when Acute: Chronic workload ration is >2.0 (greatest risk of injury)
The amount of “Load” that is too much is determined by how much you have been doing in the previous weeks.
An elite athlete training 6+ times per week will have a vastly different load to a high school athlete training 3 times per week, however we want their Acute: Chronic Workload Ratios to be the same!
Leicester City’s exercise scientists and coaches were meticulous about manage player loads. They used GPS tracking as one of a few tools to measure each players load.
If a player had spike in their workload, the coaches were notified and the player was pulled from the next session and sent for recovery work.
3) Be Specific in your training
This sounds so simple but we see people get it wrong all the time.
Athletes or Individuals wanting to compete in particular events must ensure they are training specific to that event. For example if you wanted to run a half marathon, you need to run! You don’t need to be in the pool swimming or doing reps on the bike.
You can start by running small distances and build your way up to 21 km. Using the Acute: Chronic Workload ratio and increasing your distance/load by 10% per week you can safely build your load and compete in the half marathon at your best.
Leicester City was specific in their injury prevention strategies. They identified that the most common injury was a hamstring strain and that these occurred in the last 20mins of a game when a player is trying to sprint under fatigue. They used 2 training methods to specifically address this.
- They made their players do repeat 40metre sprints at the end of every training session when they were fatigued.
- Every player had to reach and maintain a certain strength target of their hamstrings and this was measured using a device called the NORDBORD.
https://valdperformance.com/nordbord/
At the end of the season, Leicester City had the least number of injuries in the league and also had the greatest number of counter attacking goals in the league. [7]
If all of this is still confusing to you (you’re probably not alone!) then at least try to stick to these simple guidelines.
- Keep a diary of how much training you do.
- Increase your training loads gradually, particularly if your new to a sport, or coming back from a break. Keep your increases to around 10% per week.
- Be specific in your training. If you’re training for a run, then run!
If you’re still unsure, then please don’t hesitate to contact our friendly team at clinicalphysiostives.com.au
Key Evidence
-
Drew et al. (2016)
-
Load Management is Critical for all types of Injury Prevention. This was found in relation to both specific pathologies/injuries and in controlling injury risk factors.
-
Murray et al. (2016)
-
Sudden increases in Acute workload were found to have a significant relation to injury in the current and subsequent weeks of increased load. High Chronic workloads were found to have a protective affect against injury. Hence the need for monitoring of both Acute and Chronic Load, and the Acute:Chronic Load Ratio.
-
Blanch et al. (2015)
-
“The Acute: Chronic Workload ratio should be included in the return to sport decision-making process” (1. p.475)
Reference List:
- Blanch, P., & Gabbett, T. (2015). Has the athlete trained enough to return to play safely? The acute:chronic workload ratio permits clinicians to quantify a player’s risk of subsequent injury. British Journal Of Sports Medicine, 50(8), 471-475. https://dx.doi.org/10.1136/bjsports-2015-095445
- Bowen, L., Gross, A., Gimpel, M., & Li, F. (2016). Accumulated workloads and the acute:chronic workload ratio relate to injury risk in elite youth football players. British Journal Of Sports Medicine, 51(5), 452-459. https://dx.doi.org/10.1136/bjsports-2015-095820
- Drew, M., & Finch, C. (2016). The Relationship Between Training Load and Injury, Illness and Soreness: A Systematic and Literature Review. Sports Medicine, 46(6), 861-883. https://dx.doi.org/10.1007/s40279-015-0459-8
- Drew, M., Cook, J., & Finch, C. (2016). Sports-related workload and injury risk: simply knowing the risks will not prevent injuries: Narrative review. British Journal Of Sports Medicine, 50(21), 1306-1308. https://dx.doi.org/10.1136/bjsports-2015-095871
- Gabbett, T. (2016). The training—injury prevention paradox: should athletes be training smarterandharder?. British Journal Of Sports Medicine, 50(5), 273-280. https://dx.doi.org/10.1136/bjsports-2015-095788
- Murray, N., Gabbett, T., Townshend, A., Hulin, B., & McLellan, C. (2016). Individual and combined effects of acute and chronic running loads on injury risk in elite Australian footballers. Scandinavian Journal Of Medicine & Science In Sports, 27(9), 990-998. https://dx.doi.org/10.1111/sms.12719
- Leicester City: The science behind their premier League title, https://www.bbc.com/sport/football/36189778
- Weaving, D., Marshall, P., Earle, K., Nevill, A., & Abt, G. (2014). Combining Internal- and External-Training-Load Measures in Professional Rugby League. International Journal Of Sports Physiology And Performance, 9(6), 905-912. https://dx.doi.org/10.1123/ijspp.2013-0444
